In previous posts, I’ve mentioned the importance of the hacker mindset for the cybersecurity professional. Fundamental to the hacker mindset is the desire to understand how things work. In today’s post, we’re going to focus on learning how our tool-sets work. These days, it’s rare for people to take the time to learn the mechanics of what they’re doing. We know what we need to do (hit the report button) and what the result will be (report.pdf appears on our desktop), but we have no idea how it all actually works. Understanding the _ how _, is crucial to the cyber professional. It allows us to troubleshoot, spot discrepancies, and improve our craft.
In this post, we’ll go over a common tool that’s been used in cybersecurity for years: Nmap. We’ll be using Wiresharkto examine the network traffic generated for different scenarios. The requisite tools are pre-installed in our lab environment.
Setup
For Part 2, we’ll be making use of the lab setup described in Part 1, specifically the Kali and Metasploitable virtual machines (VMs). Make special note that both of the virtual machines have their networking set to Host-Only mode. Power-on both VMs and logon. Metasploitable’s default credentials are msfadmin:msfadmin (username:password).
In the Metasploitable VM, take note of your IP address using
ifconfig
Transition to the Kali VM and open a terminal. Check your IP address
ifconfig
Now compare the IP addresses to ensure that they are both on the same network.
Prep
Tools
- Nmap is a network scanning utility that allows you to discover assets and determine the status of the asset’s ports.
- Wireshark is a network protocol analyzer.
Terminology
To understand our tool-sets, we’ll need to understand some basic networking concepts.
- Network Protocols are the guidelines and specifications for how applications communicate over a network. Further reading: here
- TCP (Transmission Control Protocol) is a connection-oriented network protocol. When we say “connection-oriented”, we’re essentially saying that TCP checks to ensure that each message (packet) is successfully received. This is in contrast to UDP (User Datagram Protocol), which is a connectionless protocol. Further reading: here
- Ports are numbers that are used to decide which application the network traffic is for. Further reading: here
Nmap Analysis
We’ll begin with Nmap. In your Kali VM, open Wireshark by hitting the “Windows” key on your keyboard, typing Wireshark, and clicking the Wireshark icon. Click Ok if you get a Lua: Error duing loading: prompt.
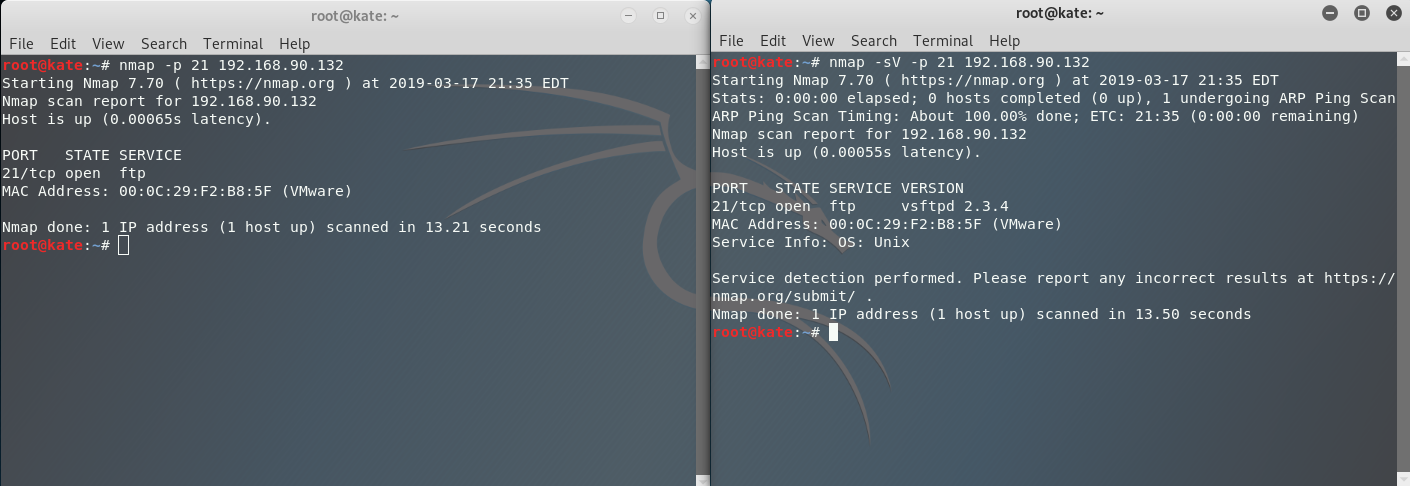
Click the blue fin on the top left (under File) to start a packet capture. Now that we have a packet capture going on, open a terminal to run Nmap. We’ll start by scanning our Metasploitable machine with Nmap using mostly default Nmap options. Use the command below, but change 192.168.90.132 to the address of your Metasploitable VM.
nmap -p 21 192.168.90.132
The -p 21 option specifies that we only want to scan port 21 on the Metasploitable VM.
When the command completes you’ll see Nmap done:. Go ahead and stop your Wireshark capture by clicking the red square on the top left.
At this point, we’ve captured the traffic for the Nmap scan. Unfortunately, there may be quite a bit of other traffic captured. No problem. We can filter the data by using the following Display Filter. Make sure to replace 192.168.90.137 with the address of your Kali VM and 192.168.90.132 with the address of your Metasploitable VM.
ip.addr == 192.168.90.137 && ip.addr == 192.168.90.132
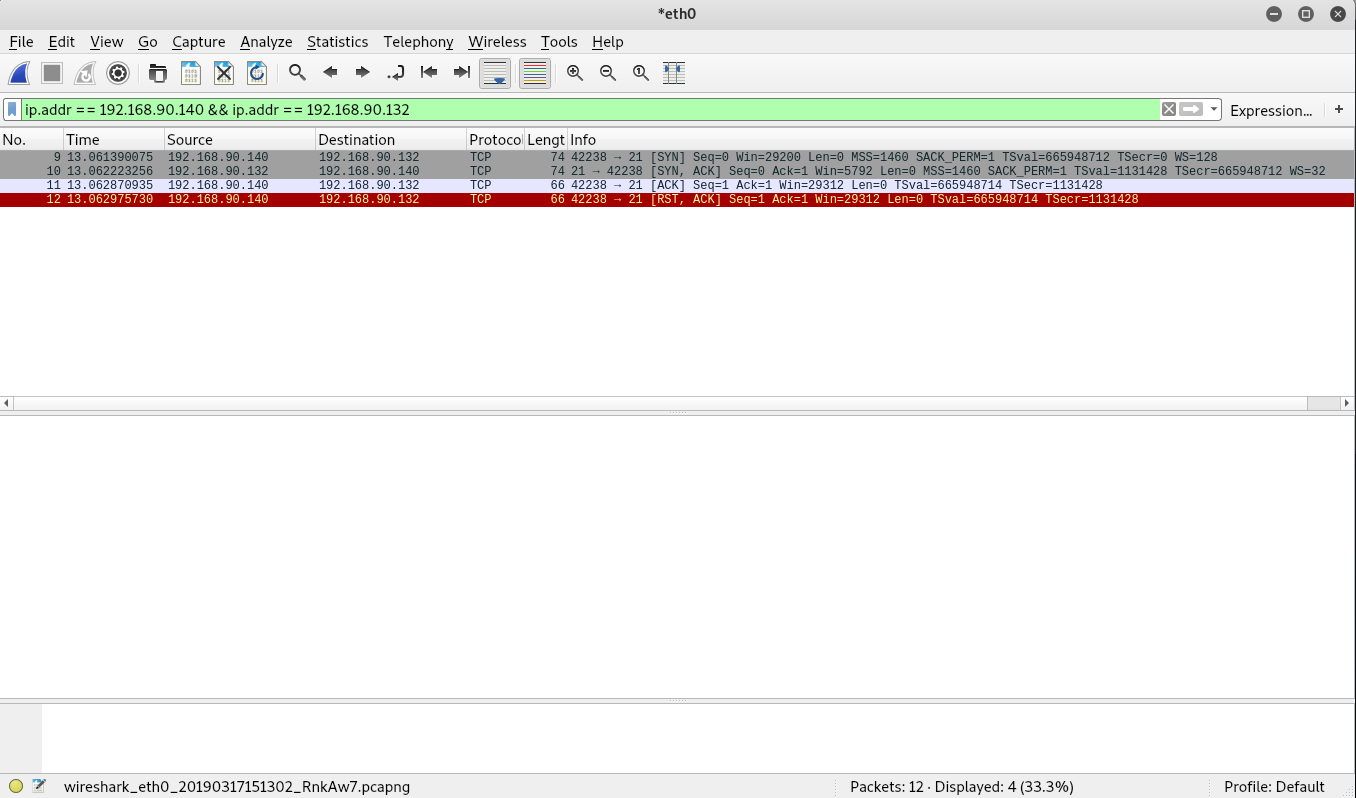
The above command displays packets that contain both the ip address 192.168.90.137 and 192.168.90.132 (The && makes sure both are present). For more information on Wireshark display filters, click here. You should see an output similar to below.
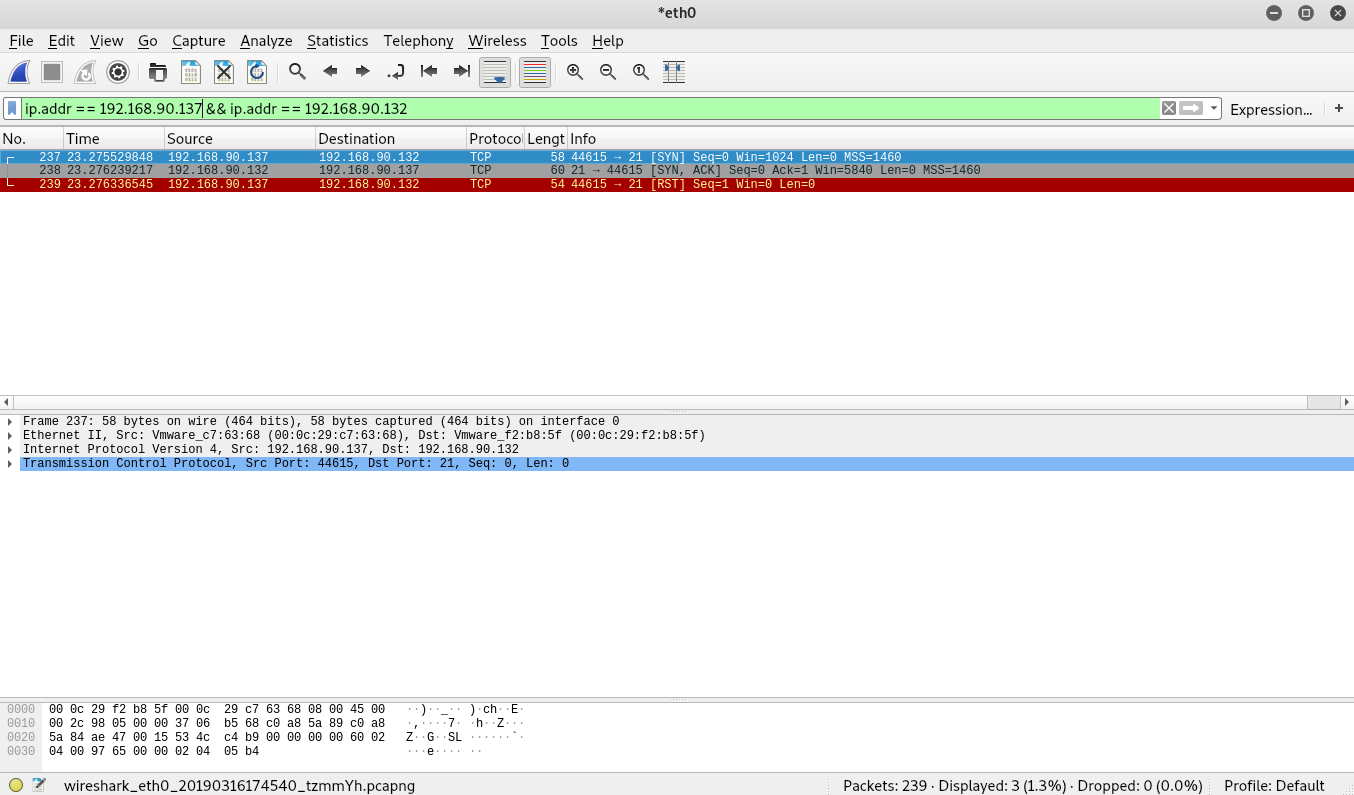
From the image above, you should see 3 packets. Remember from above that TCP is a connection-oriented protocol. To establish a connection, the TCP protocol performs an initial handshake. The process involves three messages and is often referred to as the three-way handshake. The messages for the handshake are denoted below.
- SYN -> From Sender
- SYN ACK -> From Receiver
- ACK -> From Sender
In the image above, we see a SYN packet followed by a SYN ACK packet (Examine the info portion of each packet). Interestingly, the last packet does not show an ACK packet. Instead, it shows a RST packet. RST is another type of message used by the TCP protocol. A RST message is used to signal that an unexpected message was received, which essentially cancels the connection.
So why do we see a RST message instead of the expected SYN ACK? Remember that the purpose for our scan is to check the status of a port. The SYN ACK sent by port 21 on Metasploitable signals that the port is open. At this point, Nmap has the information it needs and doesn’t need the connection anymore so it cancels the it. Let’s move on and examine some traffic for other port states.
Different Port States
For this portion, we’re going to examine traffic destined to 3 different ports: 19, 21, and 22. Go back to your Metasploitable VM and enable the firewall. Type in the msfamin password when prompted.
sudo ufw enable
Now allow port 19 through the firewall
sudo ufw allow 19
Finally allow port 21
sudo ufw allow 21
At this point, the Metapsloitable VM has all ports, except for 19 and 21, blocked by the firewall. Let’s go back to the Kali VM and perform another scan. Go ahead and restart your Wireshark capture by clicking the blue fin button on the top left. When prompted to Continue Without Saving click Continue.
Run a new Nmap scan against ports 19, 21, and 22. Remember to replace the 192.168.90.139 address with the address of your Metasploitable VM.
nmap -p 19,21,22 192.168.90.139
Once the scan completes, go back to Wireshark and stop the capture (Red Stop Sign). Make sure that you still have the display filter from above in your capture. If you don’t see any output in Wireshark, double check that your IP addresses haven’t changed for some reason.
At this point you should see something similar to the image below.
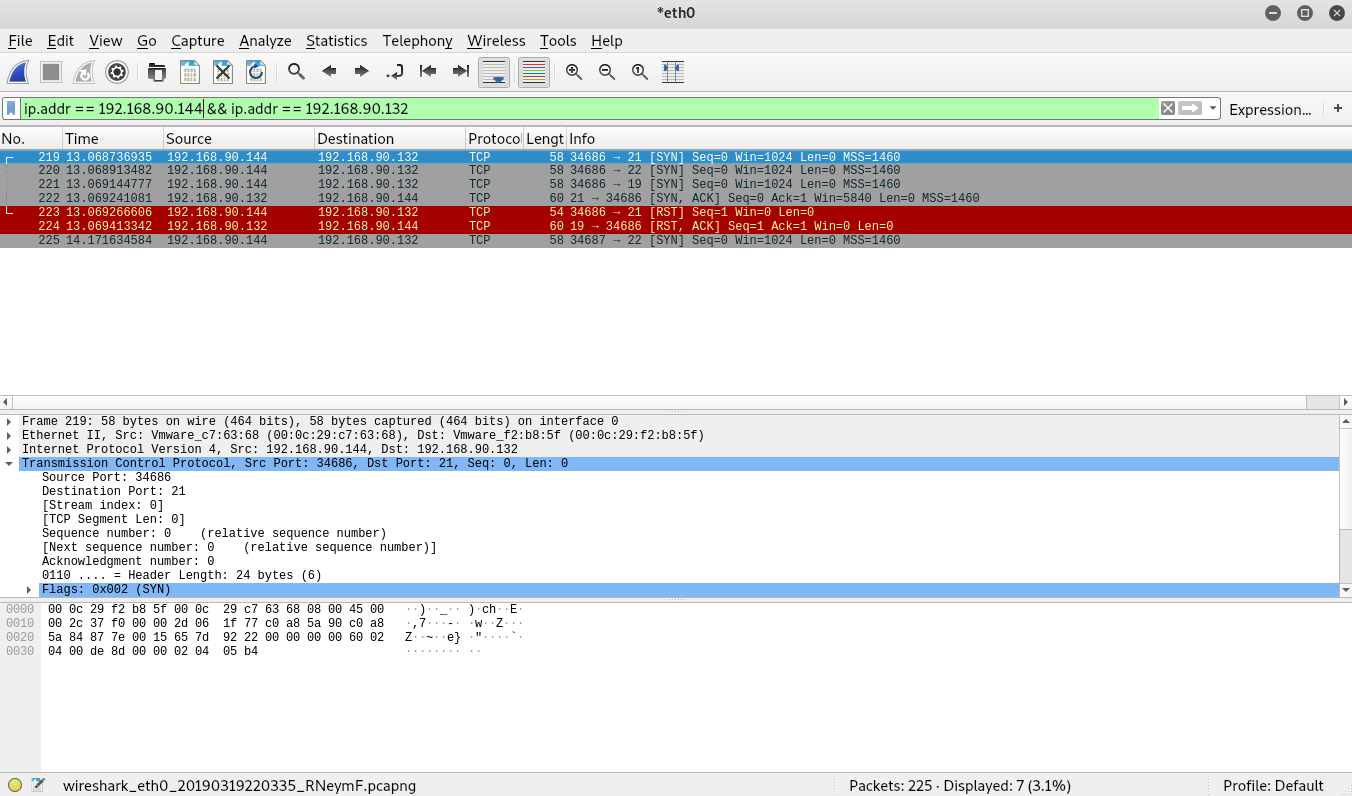
In the above image, we can see 7 packets. The traffic for port 21 should look identical to our last scan. The port information is in the info section of each packet. You should see two numbers separated by an ->. The first number is the source port, while the second number is the destination port. We’re scanning port 21 on the Metasploitable VM, but the source port on the Kali VM will be something completely different, a high port that is not currently in use.
Let’s look at the packets destined for port 22 next. As you can see, the Kali VM sends a SYN packet to port 22 (Just as it did for port 21). Interestingly, the Metasploitable VM responds with a RST ACK message. It does this to signal that there isn’t a service (ie application) listening (think using) port 19. Since there isn’t a service using port 19, the Metasploitable VM acknowledges that it received a message (the ACK part) but tells the sender that it doesn’t expect input on that port (the RST part).
Lastly, let’s look at the 2 packets destined for port 22. Notice that both packets are sent from the Kali VM and that we don’t see a response from the Metasploitable VM. Remember that we set the firewall on the Metasploitable VM to block everything but ports 19 and 21. Since port 22 is being blocked, the Metasploitable VM doesn’t reply to the SYN message sent by the Kali VM. When it doesn’t receive a reply, Nmap attempts to send a second SYN message. If it doesn’t receive a response a second time, it marks the port as “Filtered” meaning that it believes a firewall is blocking the messages.
Nmap Connection Options
For the next exercise, we’ll examine a few of the Nmap options. Specifically, we’ll look at the different types of connections that Nmap can make.
To begin, start a new Wireshark capture. Next, perform a new Nmap scan. Remember to substitute the address below for that of your Metasploitable VM.
nmap -sS -p 21 192.168.90.140
Once the scan completes, stop the Wireshark capture. We’ll use the same display filter as before.
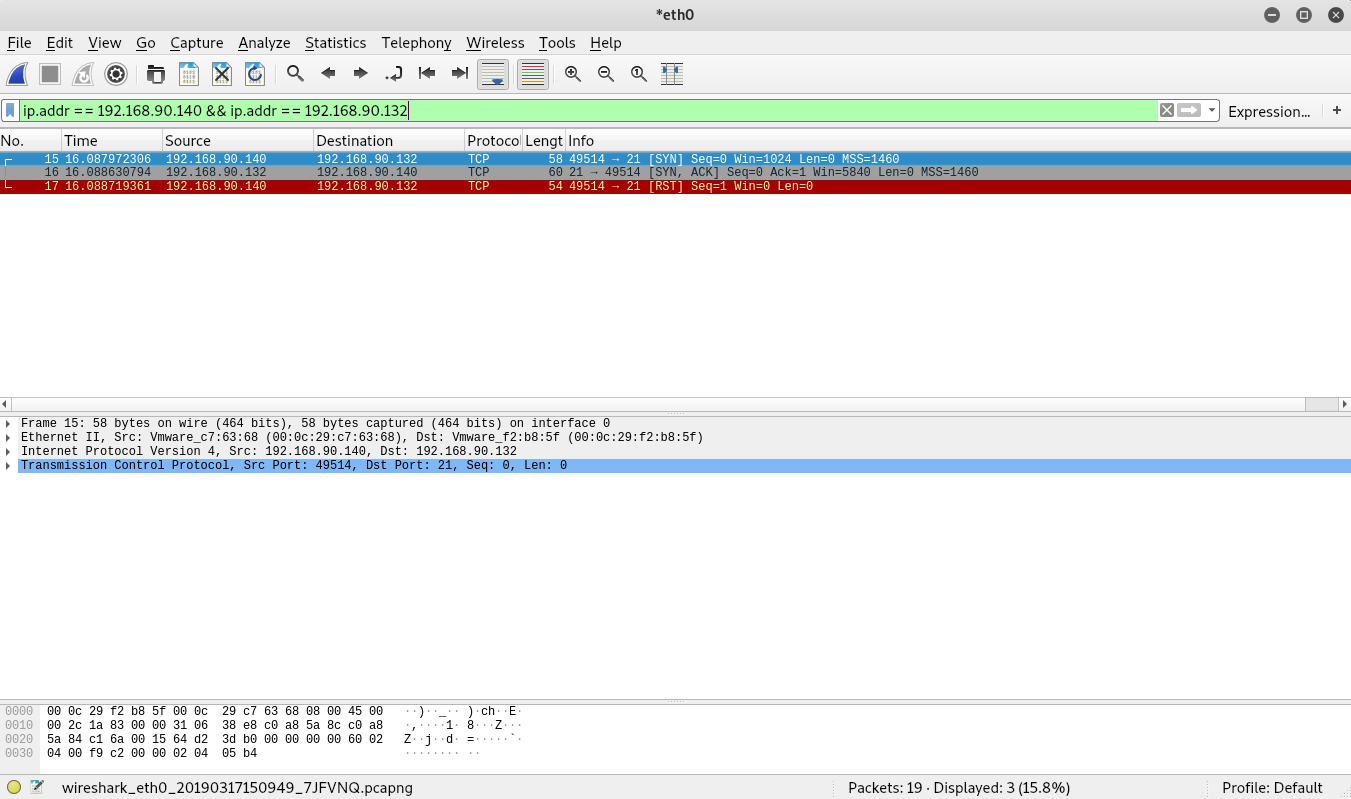
If you look closely, you’ll notice that the packets above look very similar to our initial scan of port 21. That’s because Nmap uses a SYN scan by default. Let’s examine another scan technique: the full connect scan. Start a new Wireshark capture and execute the following Nmap scan.
nmap -sT -p 21 192.168.90.140
Notice that the full connect scan resulted in 4 messages.
- SYN -> From Kali
- SYN ACK -> From Metasploitable
- ACK -> From Kali
- RST ACK -> From Kali
We see that the first two packets are similar to the SYN scan that we performed earlier. Next the Kali VM sends an ACK message. Followed by a RST ACK. In a full connect scan, Nmap goes through the entire 3-way handshake before ending the connection. Once the connection is established, Nmap closes the connection with RST ACK.
Obviously, a full connect scan results in more traffic generated, which takes more time for the scan to complete and generates more noise. It does, however, offer a significant benefit. Since services expect traffic in a specific way (i.e. the completion of the 3-way handshake), some don’t handle SYN scans very well. In fact, there are some services that can completely crash when a SYN scan is performed against them. For this reason, it’s often safer to run a full connect scan. This is especially true in environments with older systems or software.
Nmap Service Scans
Before we leave Nmap, we’ll examine one more option: the service scan. Start a new Wireshark capture and perform the following Nmap scan.
nmap -sV -p 21 192.168.90.140
Once the scan completes, stop the Wireshark capture.
The Nmap service scan (-sV) attempts to perform a service discovery on each port that it discovers is open. See below for the difference between a regular Nmap scan and one with service discovery.
Now let’s look at the Wireshark Capture for the Nmap service scan.
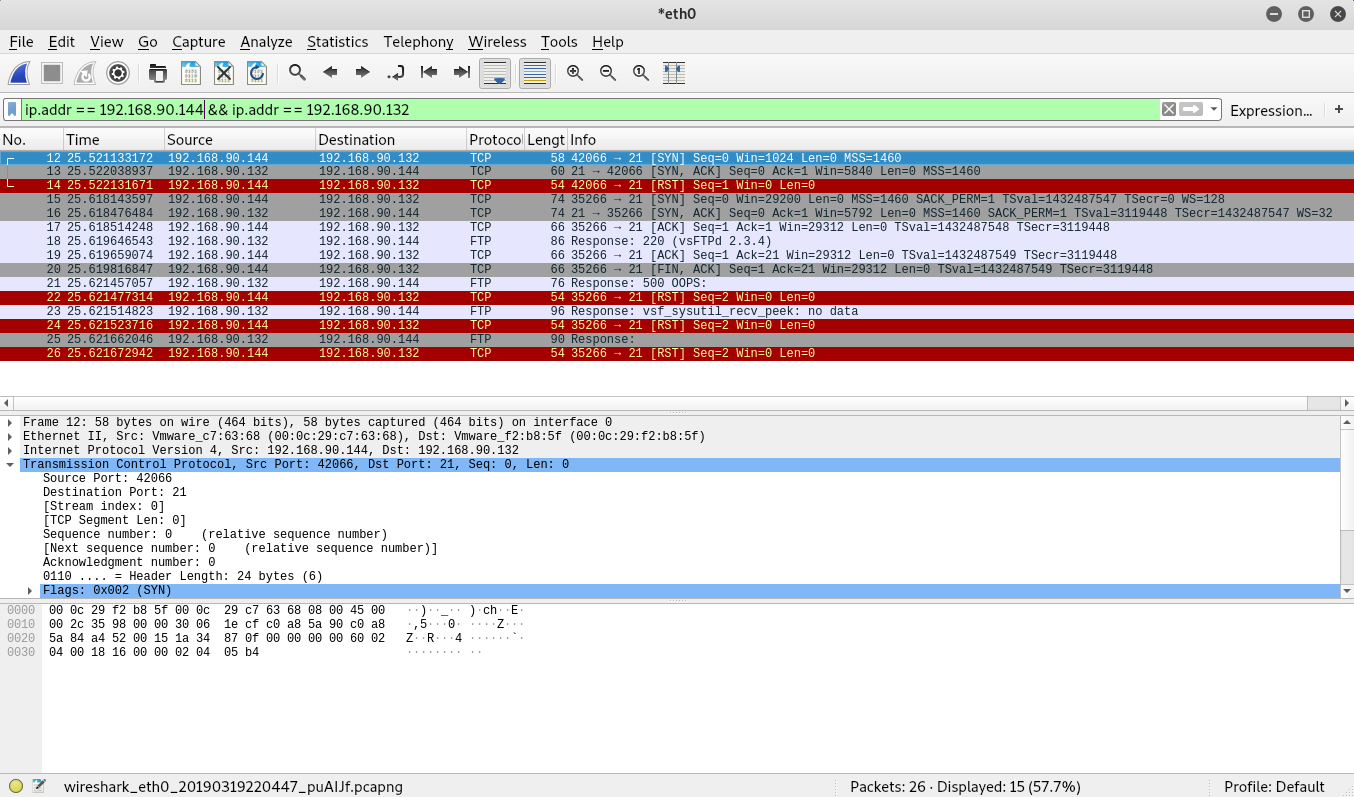
As you can see from Wireshark capture. Nmap has generated a lot more traffic than our first scan. To start with, look at the first 3 packet. Notice the message types:
- SYN
- SYN ACK
- RST
Looks similar to the Nmap SYN scan right? It makes sense when you think about it. Before Nmap performs the service discovery, it checks to see if the port is open. Once it sees that the port is open, it moves on to the discovery portion.
Let’s move on to the next three messages. Again, look at the message types:
- SYN
- SYN ACK
- ACK
Now that Nmap knows that the port is open, it connects to the port to perform the service discovery. After the 3-way handshake is complete, you’ll notice that the following packet’s protocol is different. All of the previous packets show TCP for the protocol type, while this packet shows FTP. Not that the TCP connection is established, the SSH server sends an FTP protocol message with some information about the FTP server. For this scan, we get all of the “service” information from this packet.
Let’s move on to the following two packets (both sourcing from our Kali VM).
- ACK
- FIN ACK
At this point, Nmap has received the information that it needs and acknowledges the FTP packet with an ACK message. Then it proceeds to terminate the connection with FIN, ACK message. Up until this point, we haven’t seen a FIN message. A FIN message is used to gracefully terminate the connection. It differs from RST in a key way. RST messages signal an immediate termination, while FIN signals an intention to terminate. When a FIN message is sent, the sender will still interact with the destination service until the session is terminated.
The messages for the remaining packets are denoted below:
- FTP Oops -> From Metasploitable
- RST -> From Kali
- FTP No Data -> From Metasploitable
- RST -> From Kali
- FTP No Response -> From Metasploitable
- RST -> From Kali
To start with, the FTP service responds to the FIN ACK sent from the Kali VM with an FTP packet that denotes a 500 Oops message. This doesn’t seem like traffic we would expect and from a quick Google search, it appears to be a bug in the version of vsftp that Metasploitable is running. Regardless, since Nmap didn’t receive the expected response to a FYN ACK message (which would be a FYN ACK sent from the Metasploitable VM), it sends a RST message. The Metasploitable VM’s FTP server, responds two more times with odd messages and Kali continues to send RST messages until the FTP server on Metasploitable stops sending messages.
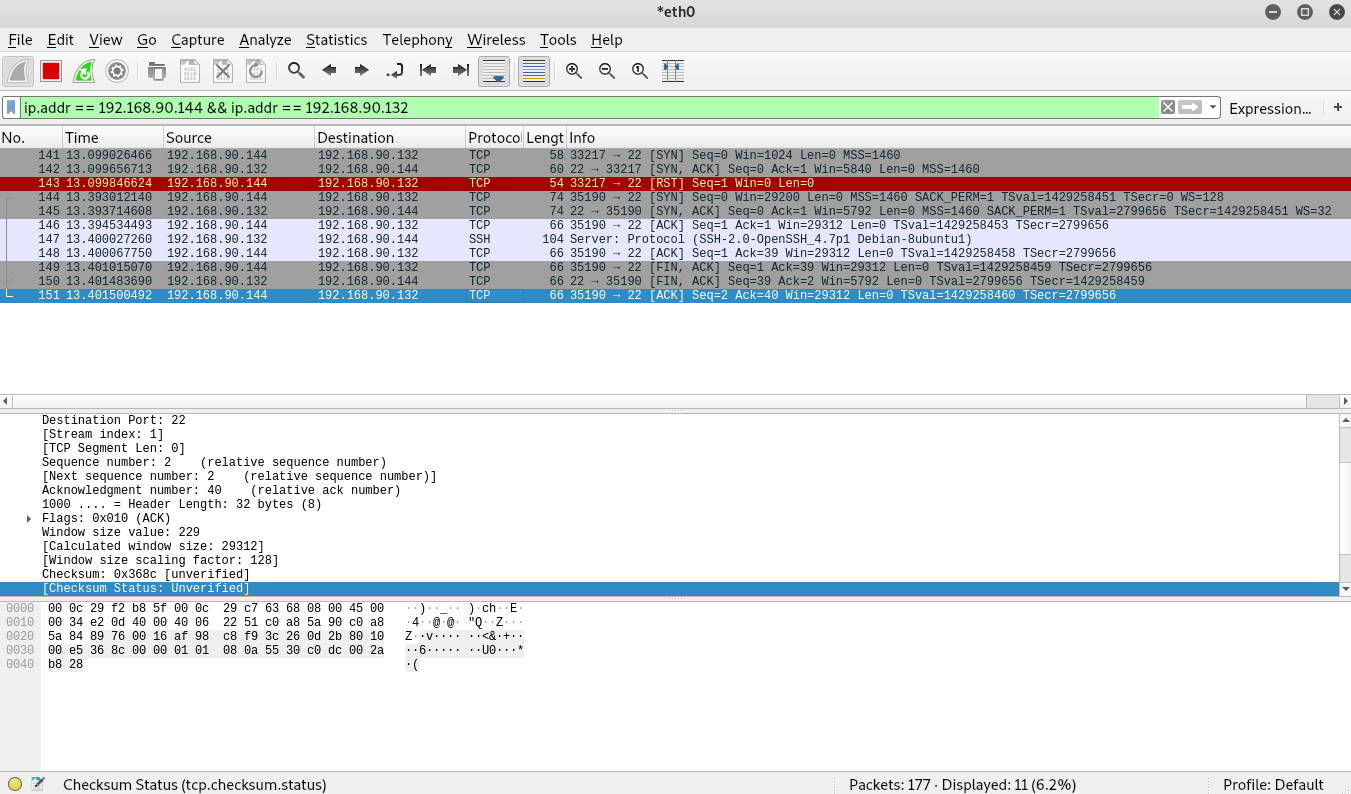
Compare this to the image below which shows a service scan for the SSH server on the Metasploitable VM. Notice that the SSH server on the Metasploitable VM responds to the FIN ACK sent by the Kali VM with a FIN ACK of its own. Kali responds one last time with an ACK and the session completes.
Closing
In this post, we’ve covered a number of Nmap’s options, but we’ve only examined a fraction of it’s functionality. Hopefully, you’ll use the techniques discussed here to explore some of Nmap’s other functionality and continue with learning other tools that you use in your day-to-day. Thanks for reading.