In the spirit of Learning Cyber 2 and understanding how things work, the next few Learning Cyber posts will focus on learning how a sample of malware works. To do this, we’ll examine a piece of malware called Jigsaw.
IMPORTANT
We’ll be analyzing a live sample of Ransomware called Jigsaw. You need to be extremely careful to prevent accidental collateral damage. Once you have the Malware downloaded make sure that you only open and run the malware in a virtual machine with networking turned off.
Setup
Before we start, we need to grab some necessary tools for analysis.
Download each of the above tools on the Windows VM that was setup in Learning Cyber 1. Make sure to set the networking to NAT so you can access the Internet to download the tools. Once you have each tool downloaded, unzip each file (Right click -> Extract All).
Unfortunately, Jigsaw requires .Net 3.5 in order to run and the Windows VM we have setup doesn’t have it. Go to the link below to download the .Net 3.5 Framework.
- .NET 3.5 Download
Make sure to click No thanks and continue DirectX End-User Runtime Web Installer when the pop-up appears.
Once the installer downloads, double click it to install.
We’ll use this setup for the analysis.
Obtaining Malware
In your Kali VM, open a terminal and type the following commands:
mkdir repos
cd repos
git clone https://github.com/ytisf/theZoo
cd theZpp
pip install --user -r requirements.txt
- Make a new folder caller repos
- Move into the repos folder
- Clone theZoo repository from github
- Move into theZoo folder
- Install requirements for theZoo (You can ignore any errors)
What did we just do?
The commands above downloaded a tool called theZoo, a database of live malware samples. Each sample is encrypted and zipped to prevent accidental execution.
To download theZoo, we used a tool called git. Git is a version control tool. Essentially git gives you a way to save versions of a project. That way, if you break something, you can revert back to a previous version. It also gives people a convenient way to share code or software.
Transferring the Malware
Since we’re using the Windows VM for the analysis, we need to get the Malware transfered from the Kali VM to the Windows VM. To do this, change the networking settings on both VMs to Host-Only. Lastly, disable Sharing on the Windows VM (Settings -> Sharing -> Uncheck Enable Shared Folders).
On the Kali VM, open a terminal and run the following commands:
mkdir repos
cd /root/repos/theZoo/malwares/Binaries/Ransomware.Jigsaw/
ifconfig
ufw allow 80
python -m SimpleHTTPServer 80
- Change into the Jigsaw folder
- Take note of your IP Address
- Make sure that port 80 is accessible through the firewall.
- Create a temporary web server to serve up the folder that Jigsaw is in. This will allow you to access the Jigsaw binary from the Windows VM.
On the Windows VM, turn off Windows protections.
- Hit the Windows Key
- Type “Windows Security”
- Click “Virus and threat protection” on the left side of the screen
- Click “Manage Settings” under “Virus & threat protection settings.
- Turn off the following settings
- Real-time protection
- Cloud-delivered protection
- Automatic Sample Submission
- Click “App & browser control” on the left side of the screen and disable the following settings
- Check apps and files
- Smartscreen for Microsoft Edge
- Smartscreen for Microsoft Store
- Click “Exploit protection settings”
- Disable all the the System settings (Control Flow Guard, etc.)
Next, use Internet Explorer to access your Kali VM’s web server: hxxp://192.168.1.3/ (change the address below to the IP Address of your Kali VM and the hxxp to http).
Click the Ransomware.Jigsaw.zip file to download it to the Windows VM.
In the Kali VM, go back into the terminal (where you have the python server running). Hit CTRL-C (Control and C at the same time) to stop the python server.
Lastly, disable the network interface on the Windows VM by going to Settings->Network Adapter. Uncheck “Connect Network Adapter”.
Snapshot
Before we begin the analysis, take a snapshot of the Windows VM. Anytime you’re analyzing malware, it’s important to create a snapshot before the malware is detonated (run). In this case, it’s especially important because this sample will encrypt all of the files on the system it runs on.
Prep for Analysis
Now that the Analysis environment is setup, we need to unzip the the malware. Right click Ransomware.Jigsaw.zip and select Extract All.. The password to unzip the archive is infected.
Drag the Jigsaw file onto your desktop and rename it to Jigsaw.exe
Right Click->Rename.
Before we begin, let’s go over some basic terminology:
- Static Analysis is the process of analyzing the malware without running it.
- Dynamic Analysis is the process of analyzing the malware while it’s running.
There are benefits to both strategies and often both are used to analyze malware. For this exercise, we’ll use Static Analysis to glean some information before we analyze using Dynamic Analysis. When the malware is actually running, there can be alot going on. Performing Static before Dynamic analysis can guide Dynamic Analysis.
Basic Static Analysis with PEStudio
Open PEStudio by double clicking PEStudio.exe. We’ll use PEStudio to examine Jigsaw.exe by dragging it into the main PEStudio window.
As you can see, PEStudio has given us a wealth of information about the Jigsaw application. We can use it to get a general idea of what Jigsaw might do when running.
Let’s start with the version section.
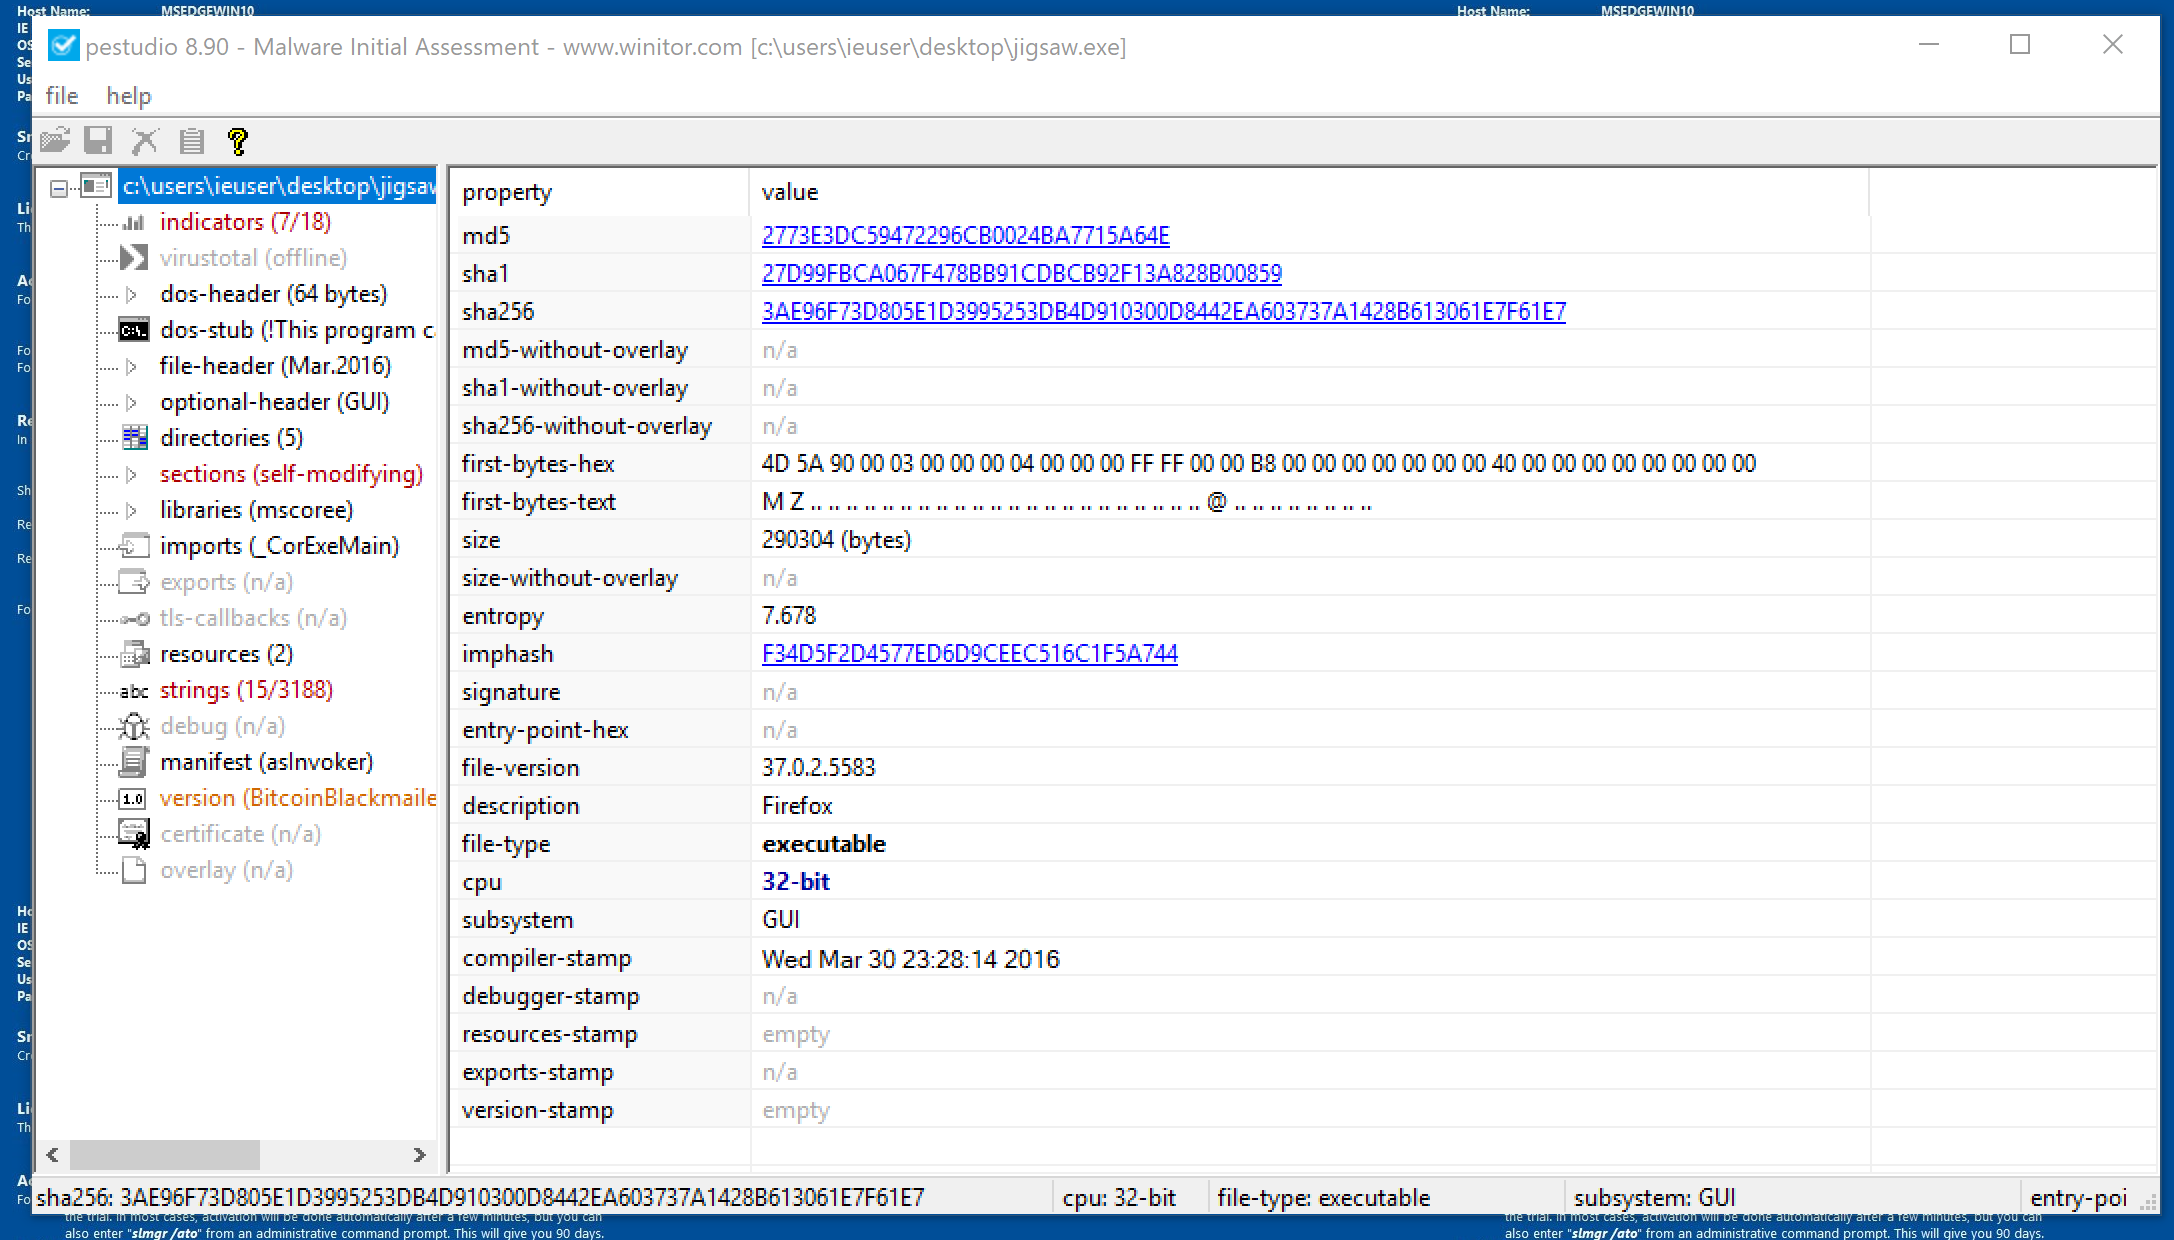
PEStudio Version Section
In the version section there’s some general information about the executable. Notice the three hash types: md5, sha1, and sha256. Often, Malware can be identified using a hash of the malware. The hash is produced by running the malware through an algorithm to generate a unique (for the most part) value. Every time that that sample of malware is out through the algorithm, it results in the same unique value (Even if its a copy of the malware from another system). For more information on Hashing click here (highly recommended).
While the hash can be used to identify a piece of malware, it isn’t a fool-proof technique. All that’s needed to change the hash for a specific sample of malware is to make a small change in the code of the malware. Note that renaming the malware will not change the hash for it.
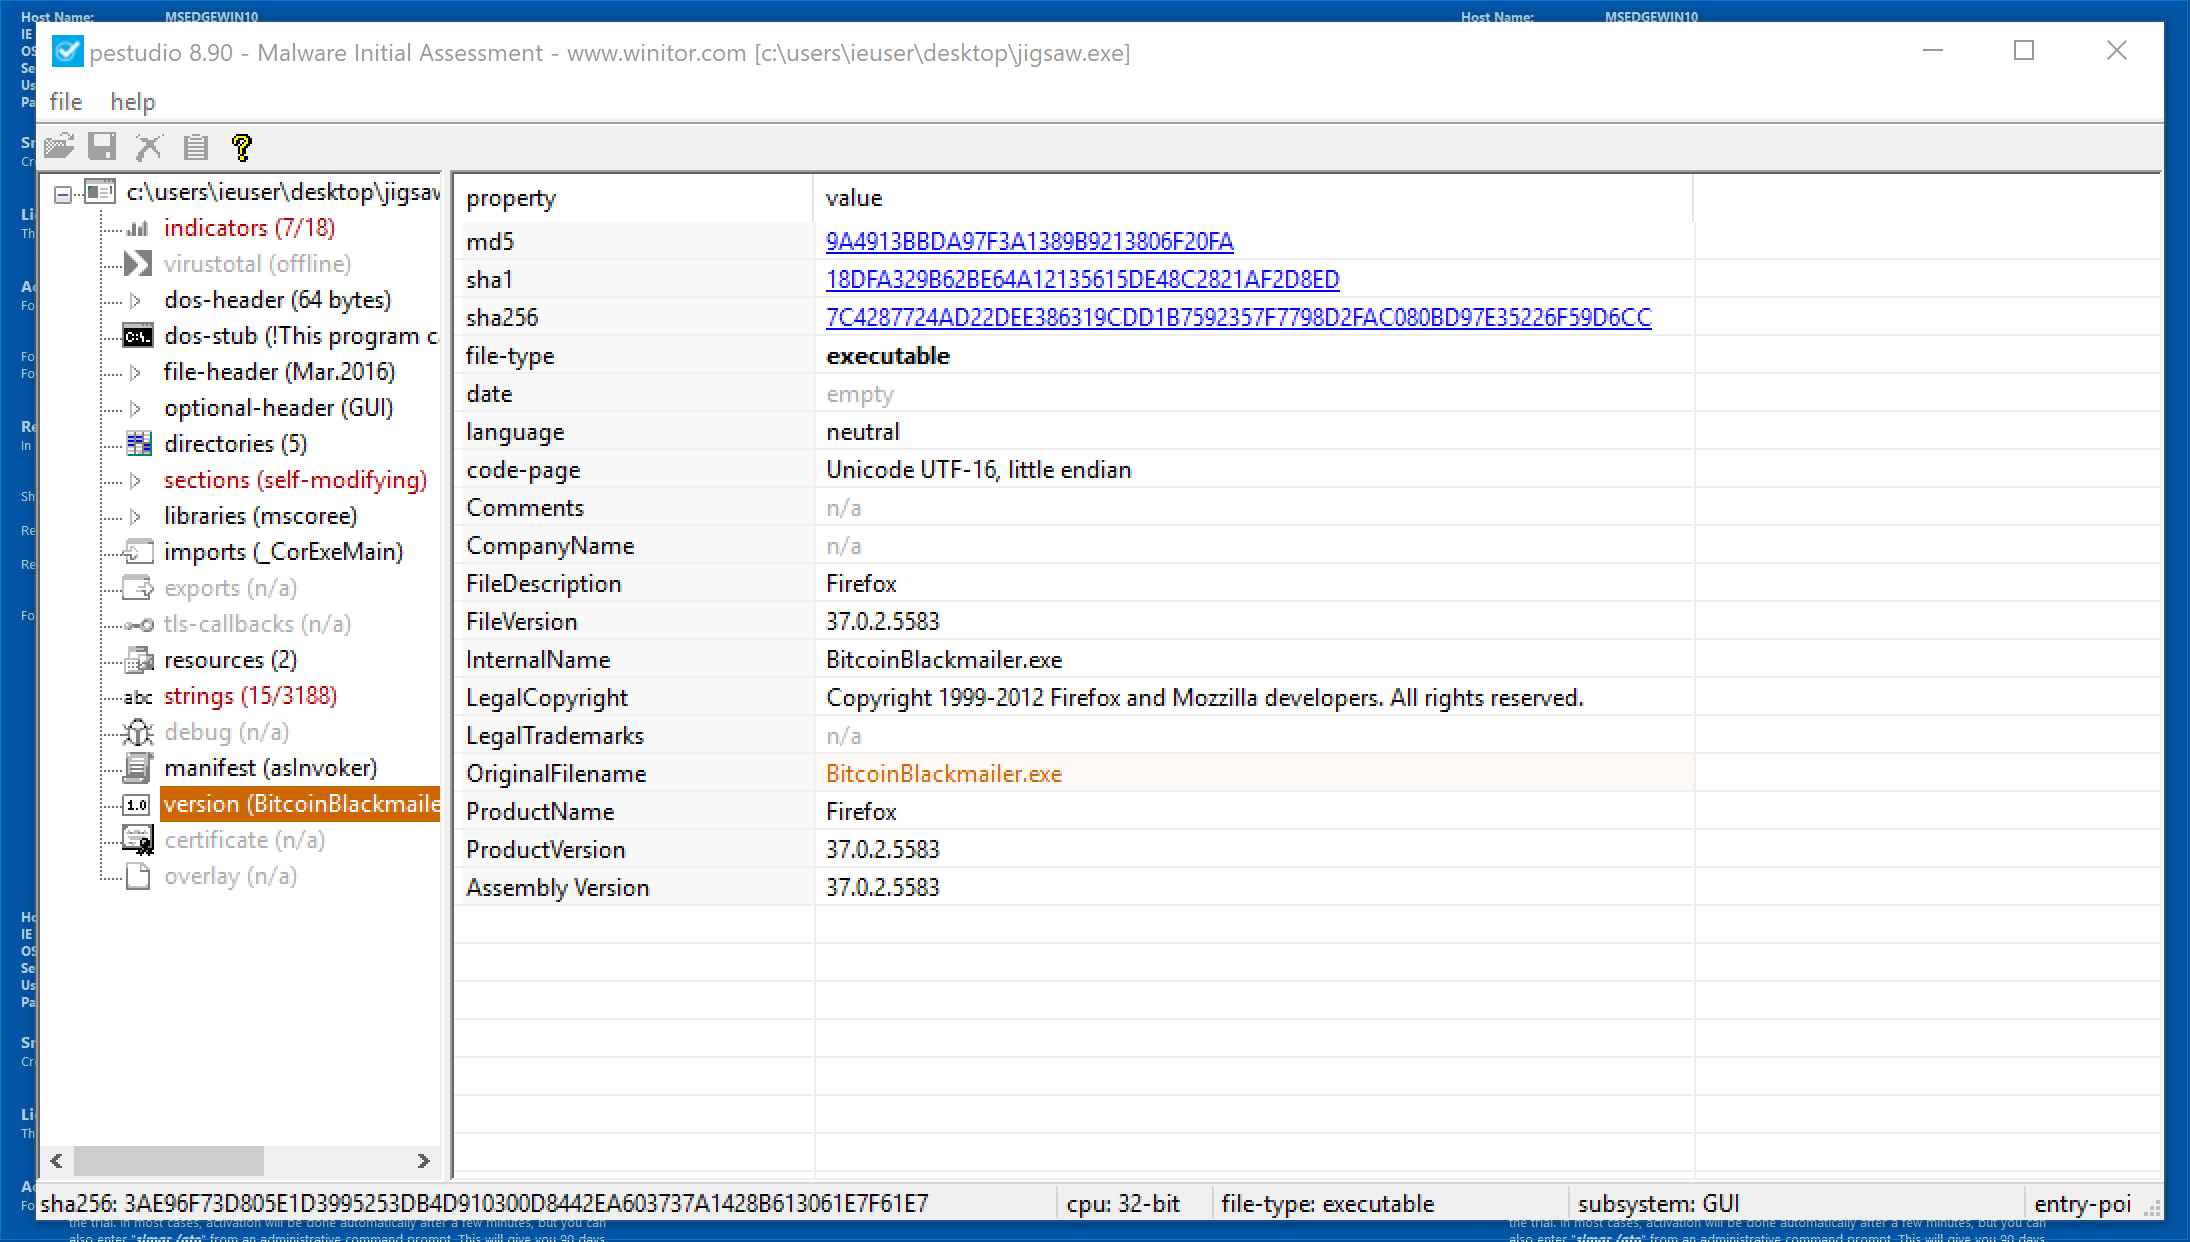
Next examine the following attributes:
- File Description -> Firefox
- Internal Name -> BitcoinBlackmailer.exe
- Legal Copyright -> Copyright 1990-2012 Firefox…
- Original Filename -> BitcoinBlackmailer.exe
- Product Name -> Firefox
The attributes above represent meta-data (data about data). When an application is compiled (think built), some meta-data is also created based on the source code. A quick look at the above attributes tells us that, likely, the original malware’s name was BitcoinBlackmailer. It’s important to note that this information can be changed at any point after compilation, so it’s not 100% fool-proof. In this case, we’ll assume that it probably hasn’t been altered since the name is so suspicious.
What about the Firefox attributes? From these, we’ll make an assumption that the original malware was designed to look like Firefox in an attempt to trick its victims.
Let’s move on to the the Strings section.
PEStudio Strings Section
There are alot of different applications to get the strings from a binary and one of them is PEStudio, but what does “Getting Strings” from a binary mean? Getting the strings from a binary extracts strings from the binary (duh). Let’s look a little closer at a binary to get a better understanding of what I mean.
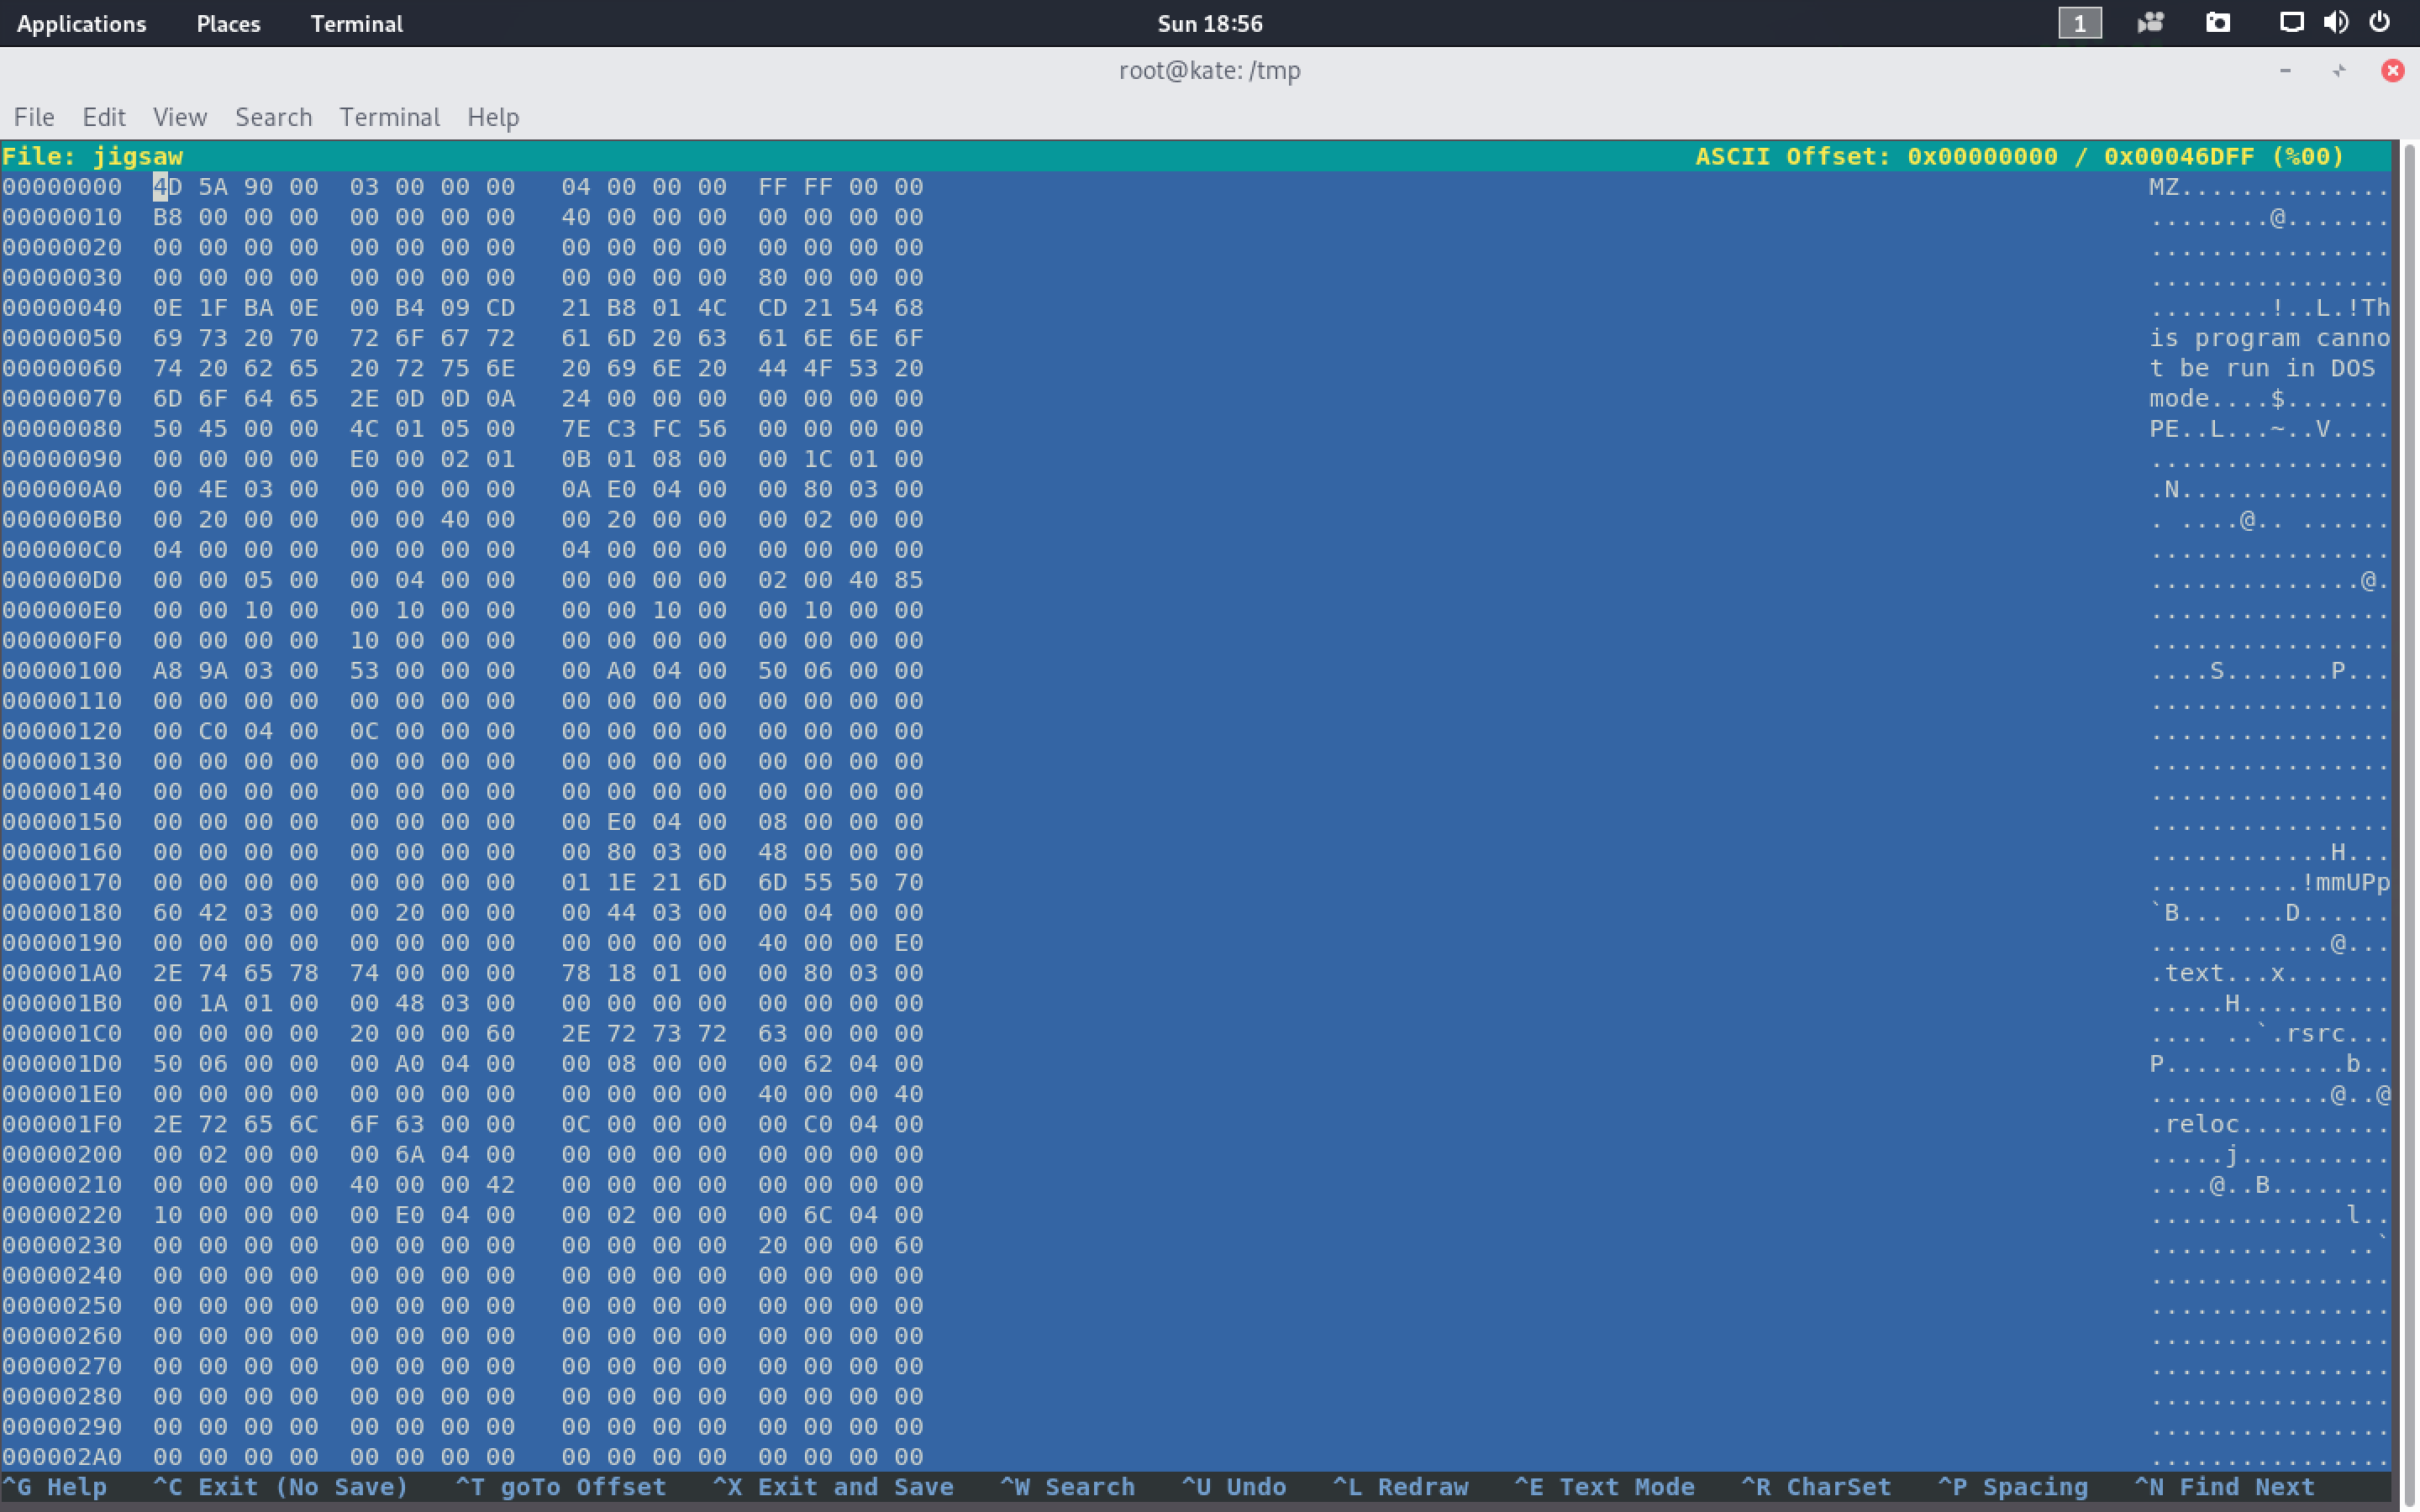
In the image above, I’ve opened Jigsaw in a hexeditor on my Kali VM. In its most basic form, an application is just a series of 1s and 0s (binary). Since it’s really difficult to examine a bunch of 1s and 0s, we often represent the values in hex. Hex is a base-16 number system, while binary is a base-2 number system. Since hex is base-16, you can represent more information per character making it somewhat easier to read. For more information on hex see here.
For our purposes, you just need to know that certain hex values represent ascii values (think text). For the most part, the hex in a hex dump of an application will represent instructions (think computer code), but some will represent text used in the application. A hexeditor or a Strings application will try to translate hex into text. Sometimes though, certain hex values can represent instructions and ascii depending on the context. In these cases, applications that pull “strings” can get mess up.
As you an see above, we see some strings on the right
- “This program cannot..”
- “.reloc”
and some random letters
- ”@”
- “S”
The longer strings are likely represent actual ascii text. The single letters are likely just hex values that happen to represent ascii but are really part of an instruction.
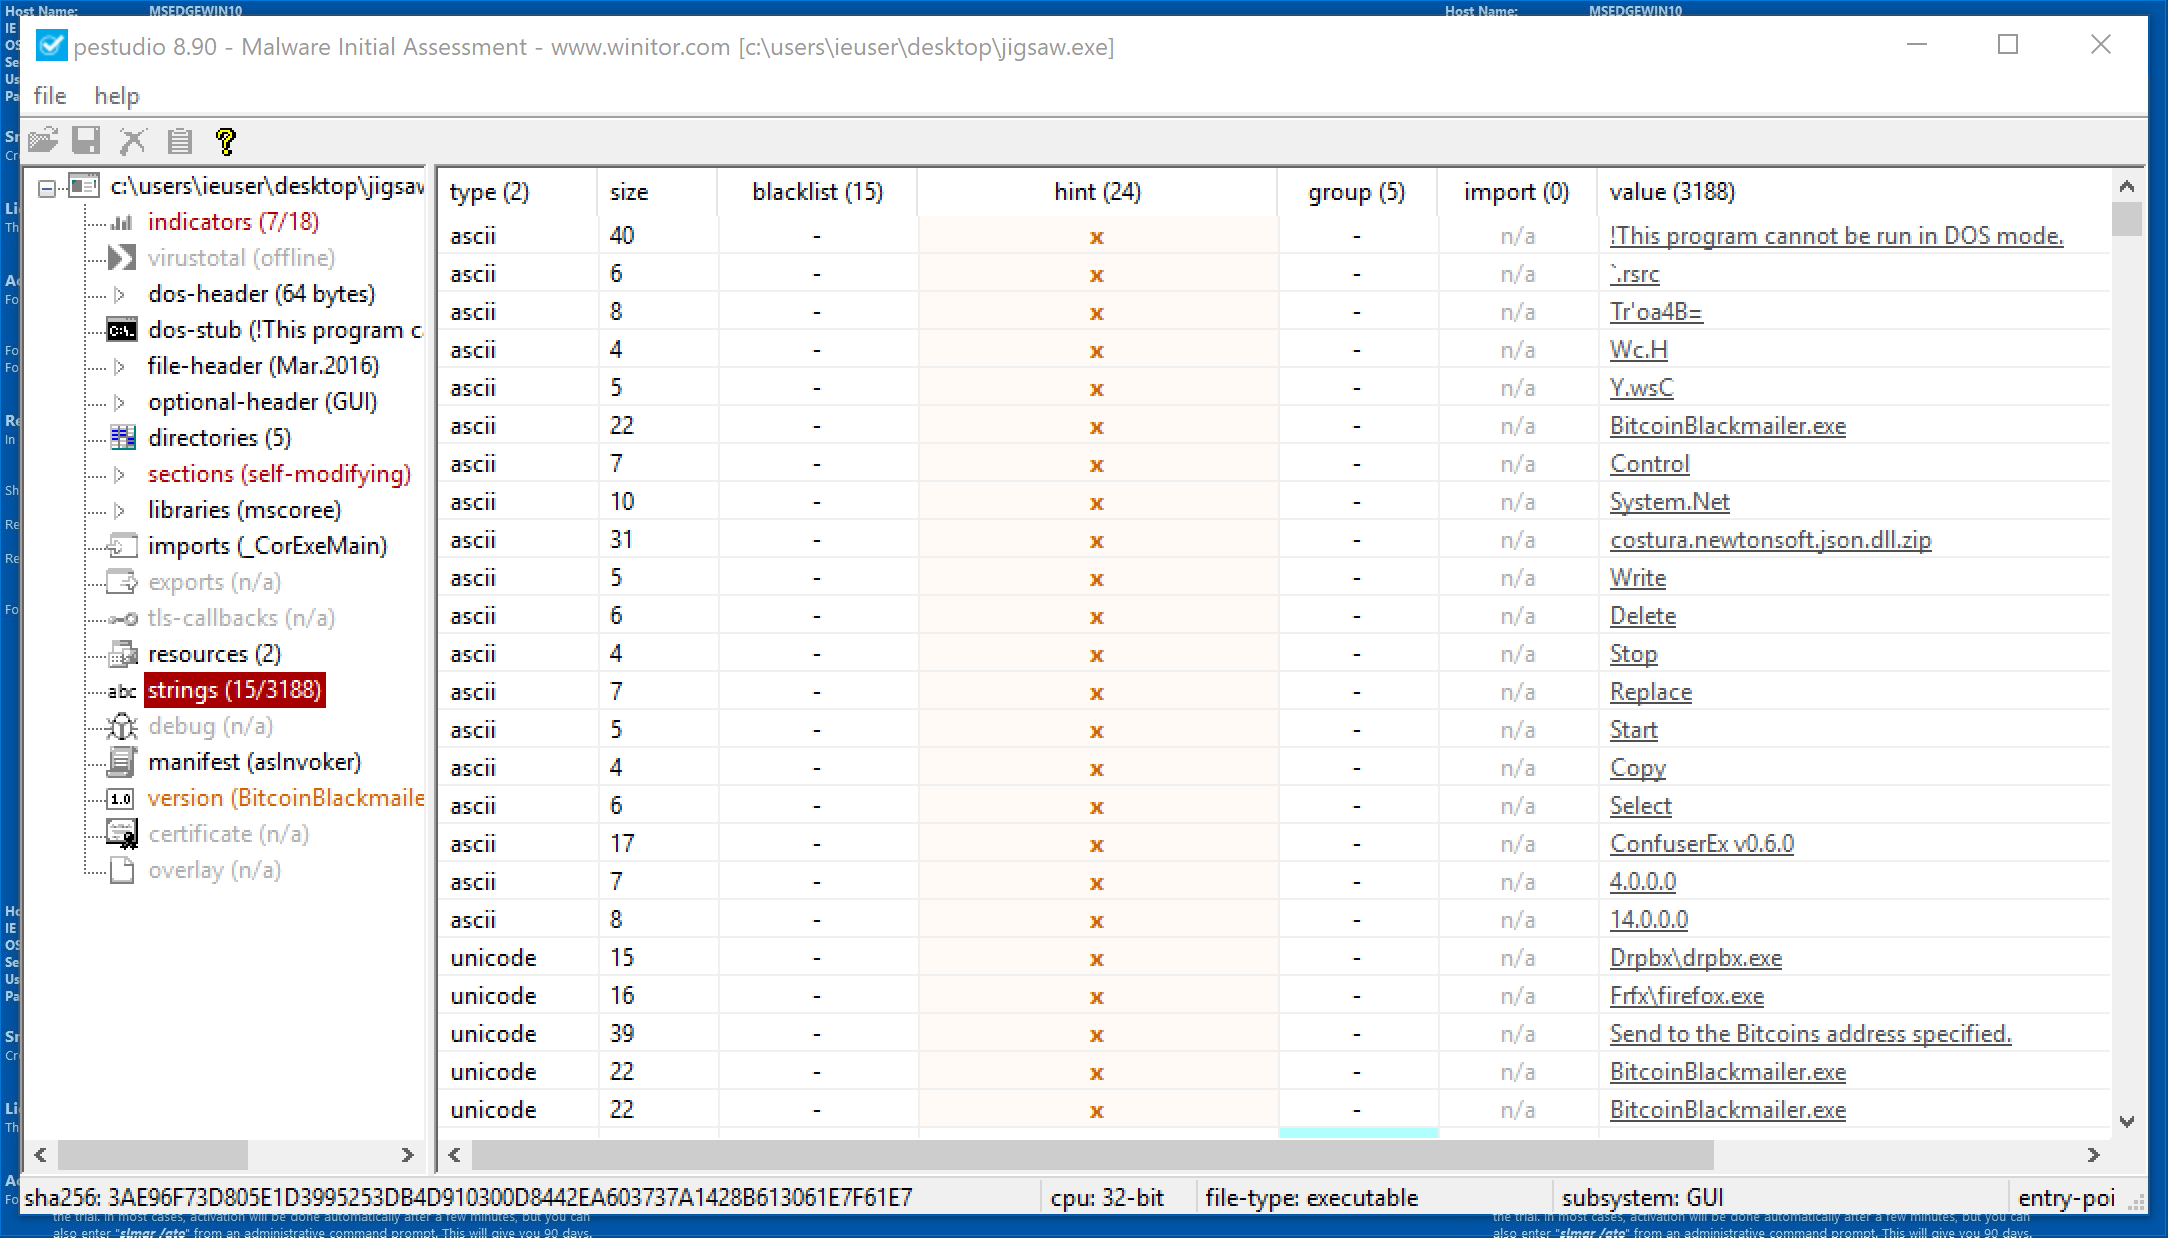
Let’s continue on to examine some of the strings that PEStudio found in Jigsaw.
- BitcoinBlackmailer.exe -> We saw this in the version tab, so it makes since that we’d see it in strings.
Notice some interesting strings that may have to do with file manipulation:
- Write
- Replace
- Copy
Lastly, notice some strings that end in .exe:
- firefox.exe -> May have to do with the version information
- Drbpx.exe -> Sounds a lot like Dropbox. Maybe the application uses Dropbox for something or maybe it tries to look like Dropbox.
Lastly, the Strings window in PEStudio has some tabs at the top. Click the Blacklist tab and examine the strings that are blacklisted.

In the above image, we can see a number of Strings that PEStudio has marked as “blacklist”, meaning that they could represent something nefarious. Specifically, notice the Encrypt File and Decrypt File. These suggest that the malware may perform some encryption (Makes sense since Jigsaw is Ransomware).
We’ve just scratched the surface with PEStudio, but we’ve learned a lot about our malware sample. I’ll leave the rest of PEStudio for future investigation. Look around and see what else you can learn about Jigsaw. In the next post, we’ll begin Dynamic Analysis of Jigsaw.